Translate

Showing posts with label Vintage. Show all posts

Friday 17 March 2023

PiCow - the Raspberry Pi Computer Originated World

There I was, minding my own business, when the lovely owner of Radios-TV.co.uk commented on my PiPatGen thread.....


Dammit! I was supposed to be tidying the workshop (in all fairness, some tidying occurred!)

A PiCow ... why not ?!?? (if you don't know what C.O.W. is ... look here.)

So I did a spot of research into video playback, and found a brilliant video playback program called hello_video designed for continuously looping video for use on advertising hoardings and art installations.

Excellent.

Some footage was conjured up, and exported from my video editing software (Kdenlive) as an .mp4

hello_video needs a .h264 fileformat to work, so I used ffmpeg to create a raw stream. 

ffmpeg -i input_file.avi -vcodec copy -an -bsf:v h264_mp4toannexb output_file.h264

Brilliant.

I created a COW directory and placed the .h264 file in the directory using scp from my main linux PC.

Issuing the command

hello_video.bin --loop  ~/COW/cow.h264

created a wonderful display! It looped seamlessly!

The command was written into the .bashrc file, so it would start up on boot.

The shutdown scripts were added, in a manner identical to the PiPatGen.

I wanted something a little better to shut down the Pi, rather than having to push a toggle button. 

A small timer was conjured up
5V comes into our circuit, and is used to power up a 4049 inverter IC. There's also a feed to a relay coil, and it's normally open contact. SW1 is a normal DPDT ON-ON toggle. On one switch, the normally closed switch is connected to pins 6 & 12 of the raspberry pi's IO's. The NO contacts on the other pole, are connected to +5V via D1 (actually, D1 is a throwback to an earlier iteration, you can just couple the switch straight to +5V!). This is the power switch. When it's operated, pins 6 & 12 are disconnected, and C1 is rapidly charged up to 5V, which switches on U1A, taking the output of U1A low, this in turn feeds U1B, inverting the signal again, and turns on Q1, which energises the relay and supplies power to the raspberry pi.

When the power switch is turned off, pins 6 & 12 are connected, which initiates the pi shutdown script. C1 is still charged up, and starts to slowly discharge through R2. When it gets to about 50% of it's voltage level, the logic does it's thing, and switches off Q1, removing power from the pi. 

R1 is made adjustable, as the time to shutdown a pi varies on which version of the pi you have and the speed of the SD card. When building the device, manually shut down the pi by shorting pins 6 & 12, and set a timer to see how long the pi takes to completely shut down (you can tell as the SD card access LED stops flashing), then set R1 to allow the relay to switch off in a little longer than the Pi takes to shut down, to allow for a bit of a safety margin. My Pi Zero W takes about 9 seconds to shut down, so I set my timer to keep power connected for ~15 seconds. I used a 10-turn pot to make setting a little easier. (Incidentally, the Pi model B takes about 15 seconds, with the same image)

The 4049 is there just as a buffer. I could have used a FET to switch the relay, as that has a very high impedance gate, and eliminated the logic all together, but I didn't!

If your Pi takes longer than the maximum time, make the value of C1 bigger. 

The circuit was built up on a piece of perf-board.
This hardware also works great on PiPatGen, which would eliminate the shutdown pushbutton.

I did try the image on my PiPatGen's hardware, and even on my resource-shy Pi B, the output was smooth. 

Onto making another case!

The PiPatGen's front panel was modified, and despite my Pi Zero having no audio output, I left the audio jack in place, as I can feed some audio into the front panel if required. 

Clearly no shutdown button is now required. 

Another PlayStation modulator was procured from eBay, another case from eBay seller seemoreitems, and a simplified 3D printed front panel was made.

If you're not using an earlier Pi with a video output socket, you'll need to add a couple of header pins, and connect to that... this is the location of the port on my Pi Zero W. The port is marked up "TV" on this Pi Zero W. Check your Pi is capable of a video output before buying, as the newest models seem to have lost this (certainly the 400) 
The image file for the project can be downloaded from 

Here's the obligatory YouTube video ...


Monday 27 February 2023

PiPatGen - The Raspberry Pi Television Pattern Generator.

Recently I came by an old Model B Raspberry Pi, whilst once the cutting edge of single board computing, is now showing it's age a bit.

So what projects can we create today with it?

How about a pattern generator for our vintage analogue TV sets?

It's got suitable composite video output (I *think* even the current Pi's (although sadly not the 400) have this (if you can find one)), so this project *may* work fine on something newer.

Here's the plan:

Have a set of test patterns available, that we can select, say Test Card F, Test Card C, a PM5544 type, maybe the "Native American" pattern, a grey scale, colour bars, SMPTE, cross hatch for setting up convergence... all running straight at boot, selected by switches on the front panel, and a button to safely shut it down.

The latest version of Raspberry Pi OS lite is downloaded and written to an SD card, we don't want (or need) the additional hassle of running a resource hungry desktop GUI.

The system is booted, with a keyboard and monitor attached.

Using raspi-config, the system was set up with SSH enabled, auto-login at boot, composite output enabled etc etc ... 

I installed the FBI (Frame buffer imageviewer), and wrote a bit of python to act conditionally on the position of a 10-way rotary switch in an attempt to display 10 different pictures. 

Whilst FBI does a wonderful job of displaying the images in the console, no way could I persuade it to act on the position of my switch, unless I issued an ESC or CTRL-C between changes on the keyboard. Even using the signals library and attempting to send a killall would work. Once FBI is running, it grabs hold of the keyboard interface and refuses to allow any changes until ESC or CTRL-C is issued on the physical keyboard. Googling the problem shows I'm not alone in my quest.

So, what else can I do? I tried a package called FIM (FBI improved), which performed no differently. 

I could get FBI to scroll through all the images one at a time, by pressing J to step back and K to step forward in the image sequence. This would work, except I didn't want a keyboard attached. I needed a method of generating a "J" and a "K" and getting it into the USB interface as if it were a keyboard. I did contemplate using an Arduino as an HDI (human device interface, that's a keyboard (or mouse) to you and I!) , there's code that I could implement to do this freely available.
Instead I asked on our street's whatsapp group to see if anyone had an old USB keyboard that they were going to get rid of, and someone did!

Excellent. A Dell keyboard duly showed up at the front door, an ideal candidate. The keyboard was quickly disassembled and the keyboard driver PCB extracted... 

Keyboards are generally wired in a matrix, each key connecting an X and a Y (or rows and columns if you like) , and each switch closes one of the X and one of the Y, giving a unique coordinate for each switch, a bit like this...
In this fictitious example above, we can see that J (SW15) puts a short between X7 and Y2, and K (SW16) puts a short between X8 and Y2. All we need to do if discover what connections are made for J and K on our scrap keyboard, and make connections to the encoder board to a couple of push buttons, to make a keyboard with just J & K on it... simple...

The keyboard matrix consists of three layers of plastic film, the top one contains all our "Y" traces, there's an insulating layer with no traces (just some holes that allow the keys to press through and complete the circuit) and a third bottom layer that contains the "X" traces. 
Identifying the two J & K keys, and their contacts is easy enough, and the traces are discovered by testing with a multimeter for continuity. 

Once these are discovered, it's just a matter if wiring up out two push buttons to the appropriate contacts on the USB encoder PCB. My PCB had a layer of black conductive material deposited on the contacts, to facilitate a reliable connection with the plastic traces on the original matrix. This was removed with a fibreglass abrasive pencil, to reveal the copper traces underneath, so they would take solder. 

Now I had a method of skipping forward and backwards through patterns as required.

Next a shutdown button was implemented using a python script in an identical manner to the hospital radio streaming  codec and monitor. Thankfully FBI didn't interfere with the operation of this. The shutdown button connects between pins 6 & 12 on the Pi's GPIO header.

Now, what about some audio. I created a stereo 44.1KHz wav file in audacity and placed some music on one channel (left), and a continuous 1KHz tone on the other (right), this is set to play using the aplay function on boot. I tried using an MP3 player, but it's glitchy with this resource-shy pi.

Next, everything is set to run on boot, and it all works nicely.


As most of my TVs don't have a video input, I'll need to create a UHF output. This is achieved using a redundant PlayStation modulator, purchased for little money on eBay. The modulator case is opened up to save space, and the small RF metal enclosure mounted inside a clamshell case, along with the Pi. Note the european modulator has a setting for I & G, this is for 6 MHz (I) or 5.5 MHz (G) sound carrier settings. Sadly the PI won't output SECAM. American users wishing NTSC output may wish to use a VHF modulator. 

Note on PlayStation modulator wiring:-

White is video in
Yellow is +5V
Red is audio in
Black is Ground. 

The audio is switched between left and right channels of the Pi's 3.5mm audio jack to select tone or music with a simple SPDT toggle switch. 

A front panel was 3D Printed with the holes in it to accommodate all the required functions. The RF is leaving on the rear of the case, via the coax already attached to the modulator. Power is supplied from a USB lead, via a switch, to the Pi and the modulator. Audio from the Pi is switched between L & R channels, and sent to the modulator, and a front panel RCA socket. Composite video is also made available to the front panel.

A front panel legend is created in inkscape, and printed out and laminated. This is then stuck to the front panel. 

I've made an image of the OS etc, which you're free to download and modify here:


Note the username is doz , and the password is DTW.

Unzip this with 7Zip or similar. Don't use the windows native unzipper. Write the image to a card using Raspberry Pi Imager or Belena Etcher etc ..

CTRL-C or escape will quit FBI (although the music will still be playing in the background!) ...

It may be wise to change the default password (DTW) at this stage, if you're connecting your Pi to the outside world. 

sudo raspi-config 

whilst you're in there , press 1 , and expand the filesystem to make use of all the space on your card.

sudo reboot

If you need to change the overscan settings or change to NTSC, you'll need to edit the boot config file

sudo nano /boot/config.txt

and edit the overscan lines. Note this is in pixels. 

overscan_left=10
overscan_right=10
overscan_top=15
overscan_bottom=15

and then reboot

sudo reboot

For NTSC change:

sdtv_mode=2

to 

sdtv_mode=0

There's 3 images and a 1K/ Music file loaded, you can change these to suit. Images are found in ~/doz/TestPatterns/ and images should be PNG or JPG format. These are cycled through in alphabetical order. To display correctly, images should be 720*576 for PAL, or 720*480 for NTSC.

The music file can be found in ~/doz/Music/ and must be called TCM.wav 

You can use WinSCP on windows to change these via the network, or copy them straight to the card if you run a linux distro (or use the SCP command in a terminal)


Thursday 6 October 2022

Lamp Limiter / Dim Bulb Tester

One piece of test gear I've never had is a lamp limiter or dim bulb tester. 

They're ideal for s-l-o-w-l-y awakening our vintage electronics up from years of slumber, without too much drama. 

I've been helping my neighbour, Steve, build a pub in his back garden, and while we were testing out some of the electrics, he donated a box of three incandescent 60w lamps to the cause. Ideal. You can't use LED lamps, and halogen lamps are far from ideal.

Here's the schematic.


It's a simple enough circuit. The live side of the mains is supplied via two 60w lamps (in series), each lamp can be switched out as required. This will limit the current and give us a (very) visible sign if there's any issue! 

I purchased a cheap energy monitor from eBay. With both lamps switched out it'll give similar functionality to the Hopi or Killawatt testers. 

I got it from eBay from eBay seller topwoodfly, and it arrived promptly. It has it's own current transformer, as you can see in the picture. 


It's mounted in a box, along with the lamp holders and switches. 


I've put a change over switch on the input to the energy monitor, so we can measure the output voltage. I expect if the output voltage falls too low the energy monitor will stop functioning. I'm not expecting any miracles of accuracy here!

All wired up in a jolly shade of yellow, just to make fault finding on the unit as difficult as possible.


The neutral wire from the mains is passed straight from the input to the output, via the centre of the
current transformer. 


Here's the finished box, running off the bench variac at about 138V

There's a short circuit across the output, just for demonstration purposes!


I must say I'm actually quite impressed by the accuracy of the energy monitor!


Quite a useful addition to the workshop :)


Friday 5 August 2022

The C2N'terface

So, we're here, sorting out our micros, and I've hit a problem... 

I'd love to build a Raspberry Pi based 1541 emulator, but Pi's are currently unavailable due to the dreaded chip shortage, and I won't pay "scalper" prices, so that's out. What's needed is to connect my age-old trusty MP3 player to our VIC-20 (or C-64/128 , PET ... anything that wants a C2N plugged in!)

Now the PET, VIC and C64 don't really have an audio in, like a ZX81 or Spectrum. They expect a processed square wave pulse train. 

A bit of an internet search, followed by a good look at the schematic of a C2N, and a plan is hatched. 

Saving is easy ... what's needed is a simple voltage divider, a shade of filtration, and a capacitor to block any potential DC upsetting the record function of my MP3 player.

Playback not so easy ... we need to peak the signal with an op amp, and square it off with some buffers. 

Here's the original C2N diagram:


The signal comes from the record/play head at a very low level, and amplified by the first 3 op-amps, IC1-2, IC1-1, IC2-1. The signal is centered around 2.5V, as there's a voltage divider formed by R18&19. The last op-amp, IC2-2 starts to clip the waveform, as it's run out of headroom. IC3-1 & IC3-2 are inverters (even if they aren't shown as such, look at the waveforms) and square off our signal to +5V square wave.

Recording is the reverse, except the inverters directly drive the record/play head. 

There's motor drive and "sense" which detects the play key being depressed. 

So here's our MP3 player interface... 


Audio comes in at J2, is DC blocked (just in case), and passes through a level control pot RV1. It's given a bunch of amplification by our op-amp, and the output is already pretty much a square wave at this point, but it's followed by either 2 or 3 inverters. The absolute phase of the interface is defined by the jumper, JP1. There's some talk on the internet that this is important. I'm not convinced, but I'm already into an inverter IC, so it may as well be a hex one! The resultant square waves are sent to the computer. A crude level indicator is provided by U1D driving an LED. This should be flickering a bit during loading. A motor drive indicator LED is also provided, driven by another spare inverter! 

Saving is easy, a voltage divider is formed by R8 and R1, and a bit of filtering by C4, the output should be in the region of 640mV pk to pk. This is fed to the line level input of my mp3 recorder via a DC blocking capacitor, C1.

The sense line is held low, so the computer will always think the play key is down. 

A board is duly designed, and sent off for manufacture. 


... and arrives a few weeks later and is populated. There's a snafu on the original layout, which involved a couple of bodge wires. This has been sorted in the latest revision!

Both saving and loading to both a Tascam wav recorder, and to my aging Acer MP3 player work well... there's a tip to setting the volume level to achieve reliable loading. The LED should be *just* glowing when the carrier is present. Once it's set it can be left alone.

Using the audiotap programme for Windows (here) it's easy to convert downloaded .prg or .tap files to a .wav file for playback. MP3 also worked flawlessly at 256 kbps. I didn't try less. 
A few rounds of Llamasoft's Gridrunner were enjoyed :)


Wednesday 27 July 2022

Mending the Micros - The VIC-20

To create some more interesting content, and explore an avenue of electronics repair I miss, I've been on eBay, and spent some money on some 80's micro-computers. Not just any 80's micro's... oh no, broken ones. 

I was hooked on computers when I was a teen. Ever since my Dad borrowed a Sinclair ZX80 from a colleague of his and I sat there ... typing away on it's membrane keyboard, learning Basic as I went. A couple of years later, one Christmas, the family got an Oric-1 (the 48K model) with colour and sound! As software was somewhat limited, a Sinclair Spectrum followed, and then the mighty Commodore 64. The hours I spent writing stuff in both Basic and assembler... 

If you don't subscribe to me on youTube, you'll have missed the first part of "Mending the micros", where I fix a down-at-heal ZX81, and give it a little more memory. It's here .. https://youtu.be/RDEty5WAtZs

In the spirit of utterly giving myself far too much to do, the Vic-20 is going to be available here, written in my own inimitable style, and in glorious high-definition on youTube here https://youtu.be/u37iBSqEdU8

The machine comes in it's original box, with a manual, a power supply, and the "earlier" type of
datasette, the C2N.

It's an early machine, that uses a two-pin plug to supply 9VAC from the small external transformer. If you have a VIC-20 or a C64 with the later type of DIN plug supply, it's important to verify it's operation, or better still, replace it, as they supply both 9VAC, and 5VDC, and the 5VDC commonly rises above maximum limits, and does damage to the machine. 

The machine is disassembled, and given a cursory check over. It looks good, except for the heatsink
which is bolted to the bridge rectifier has worked lose. It's removed, and given some new heatsink compound before refitting the heatsink and securing the screw with a dab of thread lock.

The modulator is connected to the 5-pin output socket, the machine switched on and the trusty workshop TV tuned in... 

OK, a screen full of jumbled characters. Each of the socketed IC's is removed, pins checked and re-seated. No change, unsurprisingly! 


The reset line and 6502 clocks are checked... all fine.

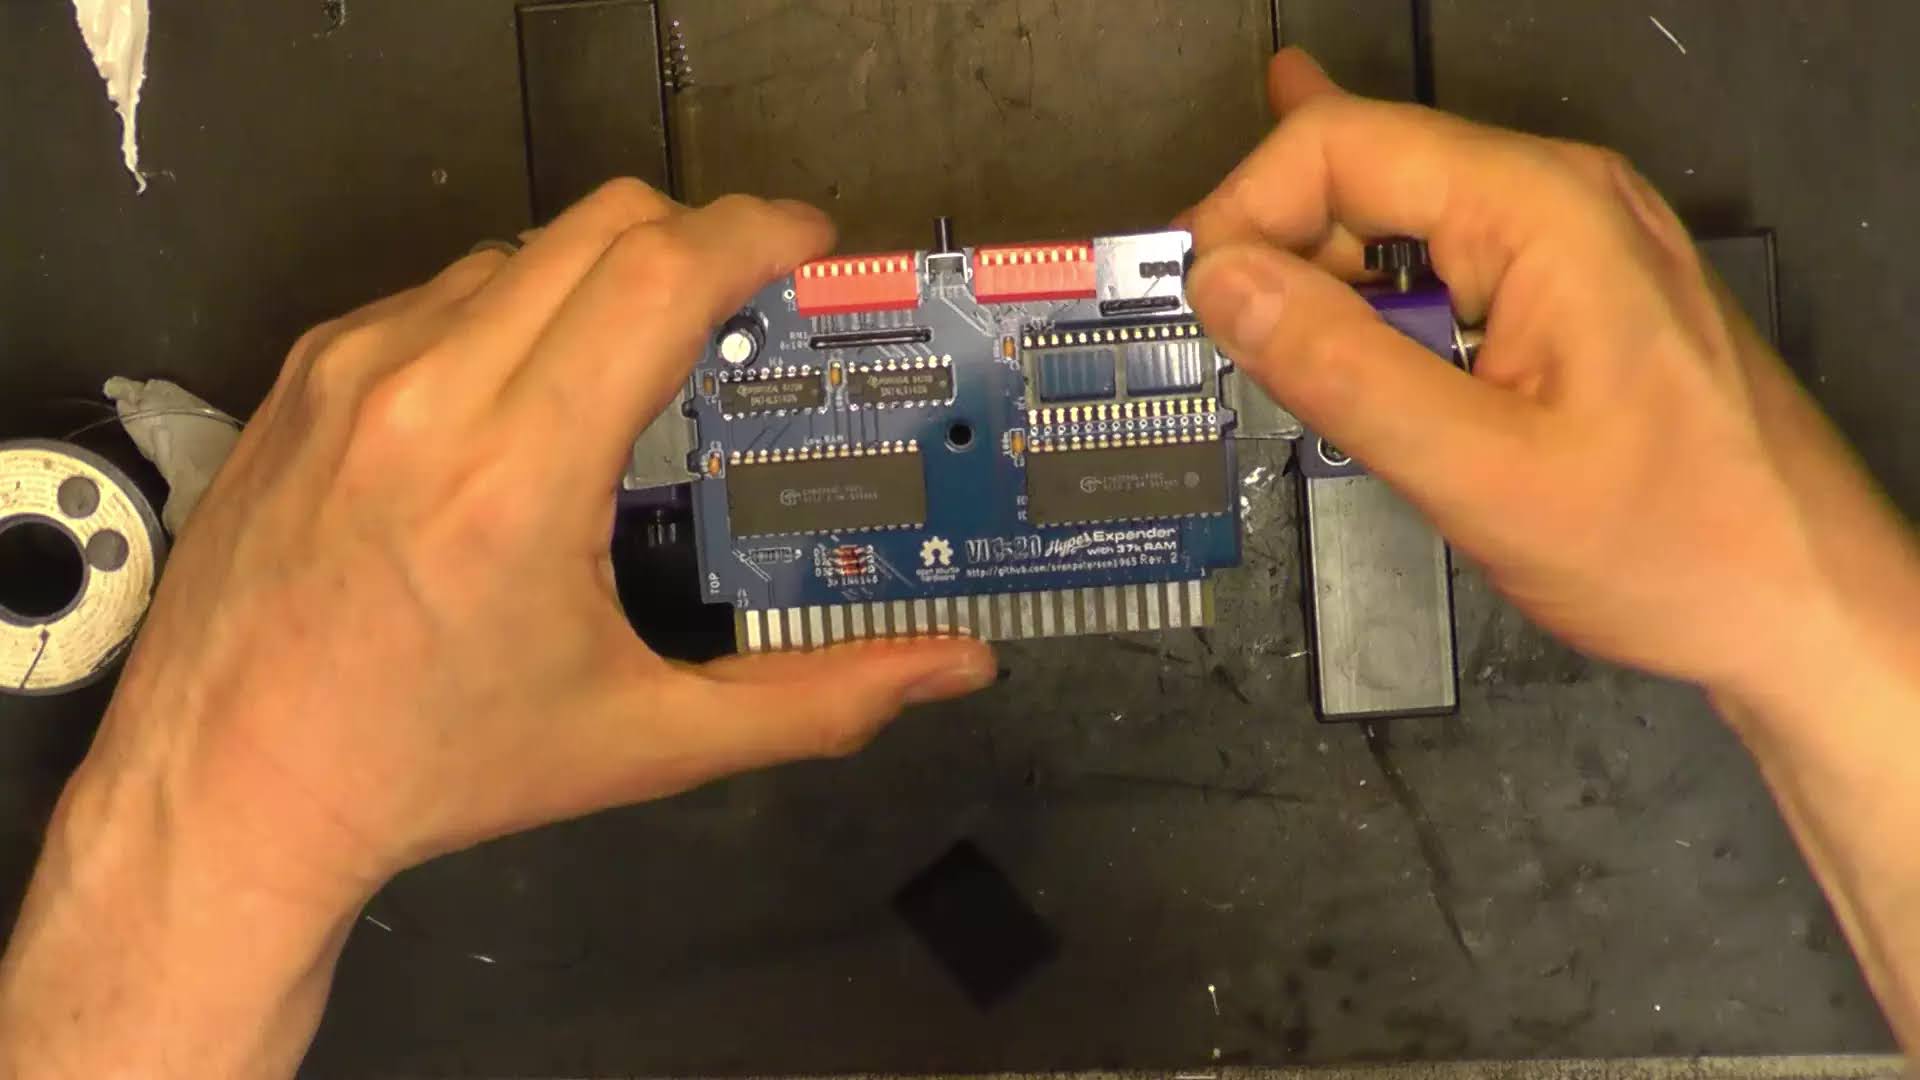
At this point, I decided that booting the VIC-20 dead-test cartridge would be a good idea... except for I don't have one! Thankfully, there is a great open-source project called the VIC-20 Hyper-expander, and it can be found at Sven's site here : http://tech.guitarsite.de/vic-20_hyper_expander.html 

The firmware set one, has dead-test in it. Excellent. A single PCB is ordered from EBay...


and is duly populated...


 ... and an EPROM blown with dead-test (and others) on it. 

The cartridge's dip switches are set for dead-test, and inserted. The machine is powered on... and ... ugh ... same.
Interestingly, when the cartridge's reset switch is pressed, nothing changes on screen. The reset line is again checked for operation, and, the reset line is asserted when the reset switch is depressed. Hmmm..

Some tea is consumed, and some reading up on the VIC-20's start up procedure... video 

Once the 6502 is reset, it looks to address $FFFC and starts to run code. This address is in the kernal ROM. The kernal then checks to see if a certain pattern of bytes is present on the cartridge slot, indicating a cartridge is present, and if so, jumps to $A000 (the cartridge) and runs code there, if not it runs BASIC..  So, if the fault is present with or without a cartridge, is my kernal ROM bad?

I hatch a plan. My kernal is a 901486-07, and a .bin image is available here :  http://www.zimmers.net/anonftp/pub/cbm/firmware/computers/vic20/index.html 

The TL866II plus is pressed into service, and a 27C64 EPROM is blown. There's a slight issue. The 27C64 has 4 more pins, and (obv.) a slightly different pin out. 


Thankfully a neat adaptor PCB is available form the wonderful myretrostore.co.uk


My EPROM is installed into the adaptor.... 

... and powered up ... ugh, no difference. Back to some tea and thinking. 

After reading up on VIC-20 video memory here : http://tinyvga.com/6561, it appears the VIC-20 moves it's video RAM around, depending on how much memory expansion is fitted. This isn't good news. If my video RAM were to be faulty, plugging in the hyper expander should, at the very least, alter the fault. It doesn't. Damn. This points to a faulty VIC 6561, not ideal. Despite this, I decide to check every other eventuality first. The RAM chips are scoped up. They are 2114 SRAM's. They are wired in pars, to give 1KB per pair (except UE1, which is always 512 bytes of colour RAM, regardless of expansion). 


Scoping along the IC's shows UC5, UD5, UC6 and UD6 have their CE (or CS) lines permanently high

(there's some noise there, however) ... this is not expected activity. Tracing back the schematic , these lines are fed from a 3 to 8 line decoder, a 74LS138, it's pulled out and tested. Its BAD! 

Is the VIC OK after all? After about an hour searching through all the 74 series logic I have accumulated over the years, and not finding a single 73LS138, one gets ordered! (According to my gaffer, the Germans have a word for not ever having the right chip in stock.  Fockingneinenchippenblasten. He assures me his German is excellent.). While I wait for the new chip to turn up, a socket's fitted, because that's the polite thing to do. 


A brand new 74LS138 is fitted, and no difference, until I realise I'd desoldered the wrong chip. Replacing the correct IC, and there's no difference in the fault. Damn. 


It looking more and more like the video RAM is not being addressed correctly, and that's under the control of the VIC. A brand new, old stock VIC 6561 is procured, and fitted ... and ... the fault remains. Dammit.

Suspicion is turned to the other two IC's related to the 3-8 line decoder, UC 2 & UC3 (74LS04 inverter and 74LS02 NOR) , but both test perfectly once removed. 

Could it be the RAM? It's a possibility. Now my DiagnoSys IC tester only does DRAM, not the 2114 SRAM used in the VIC, so a cunning plan is needed, and, thankfully Carsten Skjerk has beat me to the idea of using an Arduino to do the testing, so his project is implemented using an Arduino Nano. The details can be found here  https://github.com/skjerk/Arduino-2114-SRAM-tester
I elected to remove all of the RAM, test it all, and add chip sockets (it's the polite thing to do) 
The RAM all tests good, until I get to UE5 , one of the chips with the dodgy chip select line...

Gotcha! Some 2114 RAM is ordered... 


and duly arrives, and is tested prior to fitting.


A "new" 2114 is installed in UE5.. and it's switched on... a similar, but slightly different pattern of garbage appears on the screen.

UE5 was definitely faulty, but what about it's partner UD5? It passes in the tester... out of sheer desperation, I pull it from it's socket and fit a replacement IC... 

Bingo ...


So why does my tester pass it? 

I slept on that issue. The chip tester permanently shorts the CE pin to ground , and yet we'd had an issue with the CE logic ... was that why? No....
After doing some further testing, it turns out that my fault UD5 is intolerant to a slightly low voltage. The VIC's 5V rail is around 4.85V... the tester's is 5.1V ... I ran a load of tests and found that the IC starts showing errors at around 4.9V ... but here's the weird bit ... starts working correctly again around 4.75V!! By the time the voltage falls to 4.3V, it stops working again, unsurprisingly. Make a mental note to one day create a tester with a variable supply. 

So with the electronic refurbishment completed, the case is stripped down, and once the long and suffering Mrs Doz is out for the evening, it's sneaked into the dishwasher, along with the keyboard key caps. 

It comes out like a new one !


Meanwhile, the C2N datasette unit is given some attention. 

The cassette door is removed by very carefully bending the two sides in with a screwdriver. Carful with the door opening spring. It's probably best to remove it. 


The tape path is given a clean, using IPA on the heads, and capstan, and Rubber roller restorer on the pinch roller. 
The chassis is held into the case by three screws, this allows easy access to the tape counter belt, and the small take up idler. The belt is replaced, and the idler cleaned. 

After the case comes out of the dishwasher, it's placed in the sun to bleach the yellowing on the case for a few days, it comes out well... 


Meanwhile a suitable belt turns up from ebay to replace the main drive belt.


Replacement is best achieved by loosening the screw which adjusts the amount of end float the capstan flywheel has, and sliding the belt under.


The C2N is reassembled, remembering to re-fit the door spring, making sure it sits in the groove on the door. 


The VIC's motherboard is re-united with the case, and the LED and keyboard refitted


And the computer is tested .. 


Hardly taxing !


Time for a bit of retro entertainment! 


Now, you may have noticed the diagnostic ROM in the Hyperexpander wasn't working (which really would have helped!) .. and, infact the Hyperexpander wasn't really doing it's thing at all. Regardless of the settings on the dip switches, I couldn't select more than the basic 3K expansion. 

The Hyperexpander was scrutinised, and, yep... I'd stuck the High RAM chip in the EPROM hole... a rookie error. Having put this right, the Hyperexpander was re-installed. No change. The two 74LS148 chip select decoders were removed, and sure enough the low RAM one tested faulty. Having replaced that (and socketed both!) the cartridge was tested again. No change ... 

I suspected the RAM IC's may be faulty. So I built a 62256 RAM tester, in a similar fashion to the 4112 tester above (I'll detail this in a separate project) Both chips tested fine. Damn.

Everything on the hyperexpander is tested. Everything. It's all good... so the fault's in the VIC itself? It would have been easy to prove if I had another VIC-20 to test the cartridge in, but I don't... 

Back to the schematic. 


I turn my attention to what memory select lines appear at the cartridge slot.. The 3K expansion is controlled by the RAM lines, so we can safely ignore those. The other control lines, that don't appear to be functioning are BLK1,2,3 and 5. These are switched on the cartridge. They all go back to UC5, which is new. It's tested anyway, and is innocent. This IC is connected to one of the 6522's ... they're swapped over, the fault remains... The BLK1 line is traced from pin 14 of UC5 back to pin 10 of the expansion port.... except it appear on pin 10 & 11 ... removing UC5 shows there's a short circuit between pins 13 & 14 on UC5, 73LS138. A close look at the print around pin 14 shows it had lifted slightly. The socket is removed, and the print repaired. 

The short sill exists! Careful examination of the PCB, and a tiny solder bridge across two vias becomes apparent! The solder looks original ... has this fault existed since it was made? . Aggghhh .. the short is cleared. 

Bingo ... 


The motherboard is placed back in the case, and just tested before reassembly. It's dead. Wait ... whaaattt?

There's nothing on the power socket (9V AC). Sure enough the fuse in the transformer has let go! It's replaced and operation is restored... this thing hates me. 


Once it's all reassembled, the EPROM is switched in, as well as RAM. Excellent, we have everything working. About time... 


Another saved from landfill!