Translate

Tuesday 27 July 2021

Dash-cam irritation avoidance circuit (How to use a sledgehammer to crack a nut). A guaranteed supply.

My dash-cam has a irritating issue. If I stop at the traffic lights, and switch the engine off in the car to save a little fuel, and hopefully reduce my environmental impact, when I restart the engine, sometimes (most times) the camera hangs up and stops recording. It's powered from a 12V to 5V USB adaptor plugged into the accessory socket. What's probably happening is the supply is momentarily dipping and the micro inside the camera is "browning" out, despite having an internal battery. No messing about with the camera's settings or firmware have solved this issue. 

What we need to do is make a little circuit that ensures the power supplied is OK. 

My idea is, if the main supply dips or even switches off completely, the supply is temporarily held up by a small LiPo cell for 3 minutes. After the that, power is removed, unless the 12V is restored within that time. This should be long enough if I'm sat in traffic, even if I've switched the accessory socket off. 

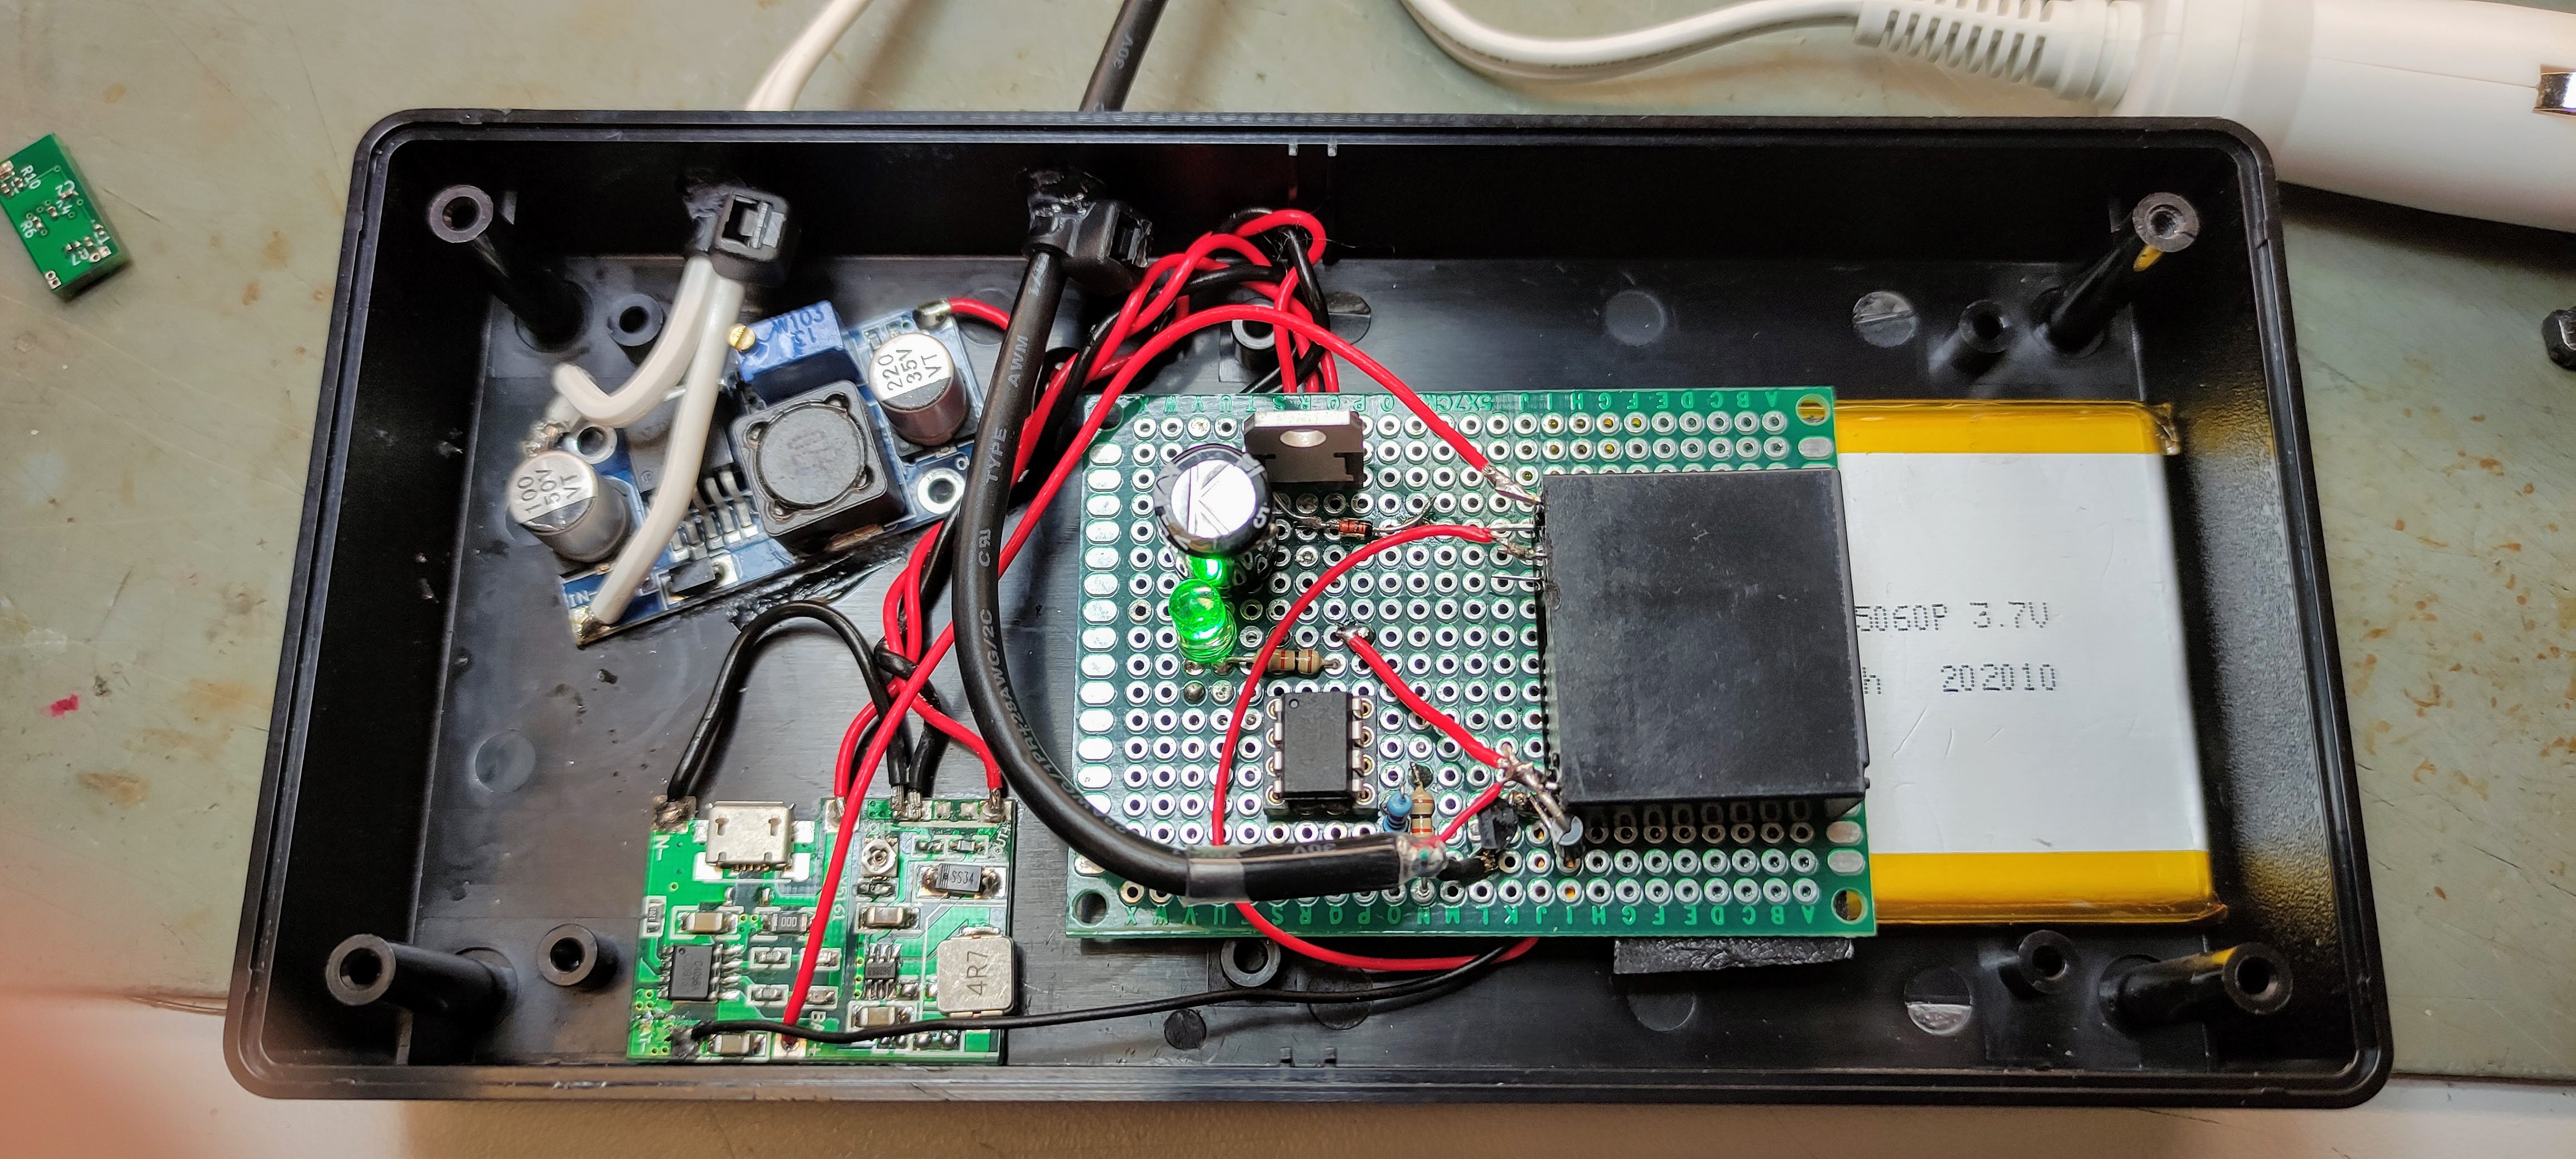
Here's the schematic:
12V arrives to one of those small buck converters (from eBay/Aliexpress etc) .. and is used to provide a 5.7V regulated supply via one half of D1 to supply the 5V for our camera and the ATTiny85 microcontroller. It's also feeding one of those small PSU boards for charging a LiPo cell & boosting it's output that I used in the Geiger counter project (albeit modified). This board is unmodified, and is adjusted to provide 5.2V output. 
Once the microcontroller has started up, it takes PB0 High, biases on Q1 via R2, and energises the relay. This connects the LiPo cell to the charger/boost controller. The 5.2V output is then connected to the other half of D1, which is currently reversed biased, and does nothing. The output from the 5.7V converter is monitored by the microcontroller PB1, via D2.
In the event of the 12V supply failing, PB1 will be pulled low by R3, as the 5.7V supply is removed, and a timer is started. 5V supply is now maintained, as the output from our 5.2V Lipo boost converter now feeds the 5V supply, as the second schottky diode in D1 is now forward biased. Once the 3 minute timer has elapsed, PB0 is taken low, which kills the LiPo supply by opening the relay, and, as there's no power supply anymore everything stays off, until the 12V supply is restored. 
R1, D4 and C3 form a reset delay circuit. C1& C2 provide some power supply filtration & decoupling. D3 prevents the back-EMF from the relay coil destroying Q1. 
The principal is the same as the circuit I used to write the mileage to the EEPROM on the Mini speedo project.

The code is simplicity itself, and is uploaded to an ATTINY85, set for a 1MHz internal clock.

# define OUTPUT_PIN 0
# define SUPPLY_OK 1
unsigned long timer;

void setup() {
  pinMode (OUTPUT_PIN, OUTPUT);
  pinMode (SUPPLY_OK, INPUT);
  digitalWrite (OUTPUT_PIN, HIGH);
}

void loop() {
  if (digitalRead (SUPPLY_OK)) {
    timer = millis ();
  }
  if (millis() > timer + 180000) {
    digitalWrite (OUTPUT_PIN, LOW);
  }
}

Possibly (!) far too complicated. I could simply use a high side drive FET circuit to drive the output, and use a simple RC time constant to drive the FET, but I suspect the actual parts cost would be about the same, and I don't have a suitable FET in the junque box!

Right, down to construction...

Having got a bunch of parts from the junque box, the circuit is constructed on a bit of perf-board.  

I added an LED across the 5V output, just so I could see what was going on during testing.


All mounted up in a *slightly* too big box, and I could have used a smaller relay (had the junque box provided one) . Input lead is connected to an accessory plug, and output via a USB socket. 


And finally put into the clutter box in the car, and connected up. It performs faultlessly ...


Which is a good job, because this is the state of the wiring on the old USB supply I'd just removed ðŸ˜¬

Sunday 4 July 2021

Aurex (Toshiba) SB-A10B

The ever-cheerful Matin's been badgering me to do a couple of amps for him, a beautiful Luxman R-1040, and an awful Aurex SB-A10B ... he's off on holiday, so dropped them off on his way past...


The label helpfully has the fault description "As they say in Brum, it woo gooo!" which roughly translated means it's doesn't work.

Fancying a quick win before tackling the enjoyable, but somewhat arduous task, of re-capping his Luxman, we'll have a quick look.

It's one of those small form factor separates, and quite well regarded (by those who don't have to fix them) Aurex was Toshiba's "posh" range of hifi.

Something's nagging me in the back of my mind, that last time I did one of these it didn't end well... 


The first challenge is to get the damn thing apart. Remove the Bass, Treble and Volume knobs, and every damn screw you can see... there are plenty. Don't forget the two recessed ones.


Now start wiggling the case around until frustration builds to an almost intolerable level. 


Eventually the top should "ease" forward. Not much room in there....

We need to get the bottom off now....

.. and at this point it's worth noting that the service manual tells lies. At no point does it mention that you need to remove this screw. Remove it. 

Now spend another 5 minutes wiggling the case like a demented fool, only to discover you can't until you remove the two plastic tubes that surrounded those two recessed screws from earlier.


... remove the two plastic tubes, take a deep breath and start wriggling the case like a Tory MP in front of a select committee, until it finally yields. 

You are now faced with a densely packed lump of electronics. Complete with surface mount resistors (in 1979!) ...


The mains fuse is located under a small plastic cover by the on-off switch. It's visibly blown, and looks to have failed with purpose.

It's a T1A fuse, and is duly replaced.


Voltage is gently increased on the variac, whilst monitoring the current, and it's very clear something is under a lot of load. 

Measuring the output transistors on the left channel, and all is well... measuring the right hand channel and the output transistors (2SB595 and 2SD525 respectively)  are short circuit, well bang goes my quick fix... and they're made from unobtainium (enter the whole of the internet saying they're still available on eBay, off you go and order them then, good luck if they're shot or fakes). Great. 

Some discussions are had with Martin, ruining an otherwise pleasant holiday no doubt, and I reckon an MJE15030 and MJE15031 will do as sunstitues, so some are ordered from a reputable supplier. I will not be beaten by mere machinery. 

I have, however, got an awful sinking feeling... 

... eventually the Luxman is finished (phew!) ... so it's back to this ... 


The heatsink and output transistors are removed as one piece... Both transistors are lose on the heatsink! No small wonder they failed.

The NPN device has been especially warm!

Look at the state of the insulator! We'll have a nice new one.

The MJE15030G and MJE13031G substitutes are pressed into service, after checking the driver transistors are undamaged, which they are...

Both channel's screws are locked into place with a dab of thread lock.

The unit is lashed up naked on the bench, and power is supplied gently via the variac ... after a few seconds the speaker protection relay clicks, indicating there's no DC on the speaker outputs.. Good.


The bias is set up as per the service manual, and speakers connected up... 


... and knock me down with a feather, it all works and sounds great! It's left on test for a while playing The Lasters by Fred Deakin. 

Now the fun and games shoehorning it all back into the case...


... and after much cussing and swearing ... 

... another saved from landfill!

Luxman R-1040 Repairs and restoration.

 Look at it..... 


...Just look at it...

What a thing of beauty. A joy to behold. 


It's a Luxman R-1040 receiver, dating from 1978.
I'm somewhat jealous. A quote from Hifi Engine "It has a genuine output of at least 40 watts continuous per channel into 8 ohms from 20Hz to 20,000Hz with no more than 0.05% total harmonic distortion." That's a very fine spec today, let alone 1978.

This one belongs to cheerful Martin, and has issues. It makes a noise like the tide going out when it's first switched on, some of the lamps have failed, the pots and switches are all scratchy, and Martin would like it re-capped. No mean feat. 

Right, let's crack on... 

There are 6 fittings, which look like they'd be perfectly at home on some Ikea furniture underneath. Remove them with the receiver on it's side, and simple slide the whole chassis out. Put the wooden cover somewhere out of the way, where the cat won't use it as a scratching post.
... it's almost as good looking on the inside as it is on the outside... look at all the space (are you listening Aurex!) 

Access is generally easy. We're going to need to remove the power amp board from the output transistors, and the volume control board to gain access to some of the caps thereon, but it's all very nice.
It appears a cap has let go in the past, as there's some debris... 


A quick look at the service manual and some nice Nichicon caps are on there way. (I would have gone with OE Nippon's, but the price!! I'm damned if I'll pay over £50+VAT each for some of them!) 

You've got to love the march of technology! The new cap on the left, which has a better specification than the old on the right...


The output transistor's heatsink is removed to facilitate change of capacitors, and the output transistors marked up, so they go back in the same order, and the old heatsink grease cleaned off and replaced with thermpath. 


There's a considerable number of caps in this unit, so it takes some number of evenings to complete.


Martin mentioned he wanted the dial lamps replaced, as one had failed... 

This necessitated removal of the front panel...  

.. and the dial glass. 


Despite the remaining dial lamp shining a white light, when it was disassembled, There were two green caps, which had faded / melted with the heat. The original illumination would have been green.


The white wire is disconnected from the power supply tag pin 10, and a 1N4007 diode and a 470uF capacitor are fitted to switch the supply to DC, so we can fit some appropriate LEDs easily...


... nice...


Bias is set for 45mA (after a minute or so's warm up), DC offset nulled out and the pots and switches cleaned.


And finally all buttoned up and tested. 


Friday 2 July 2021

Yet even more Raspberry Pi NOAA (& METEOR) fun

Well, it had to happen. The Pi Zero reeiver at Evesham promptly refused to talk to our old server a while ago, and the Cheltenham receiver had been disconnected for some time whilst a workshop re-organisation went on.

This morning, the Evesham receiver, rebuilt with a Raspberry Pi 4, and now sporting Raspberry-NOAA-V2


It's comprehensive files can be found here : https://github.com/jekhokie/raspberry-noaa-v2

It's really easy to install, with a couple of caveats. 

When you run install_and_upgrade , it takes a long while to run, even on a Pi4. I thought it had hung up. It hadn't... ! If a setting is altered, it runs much quicker on subsequent occasions!

It failed to install the correct blacklist file. I simply copied the file from the old receiver, and all is well.

It's got a fabulous in-built web console, and it's currently configured to drop it's pictures automatically to a new web page at https://doznoaa.blogspot.com/

- UPDATE - I appear to have upset google, and had posting limited for both the noaa blog, and this one ... another solution is required! I've removed doznoaa... pity it worked well.


The Evesham antenna hasn't changed, and still produces noisy pictures, I doubt it'll ever decode METEOR M-2. I'm planning a QFH in Cheltenham one day !

I'll get the Cheltenham receiver up and running soon...