Translate

Monday, 20 September 2021

Sharp MZ-700 keyboard repair.

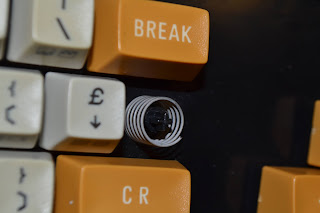
Back to the Sharp MZ-700. You may remember mine was missing a "blank" key. User psmart over on the Sharp MZ forum, very kindly provided me with a spare key and pillar/contact.


The machine is disassembled again...


The keyboard is flipped over. I want to avoid disconnecting that fragile keyboard connector, and making a load of work for myself. 27 screws are removed..


... and the PCB separated from the keys & frame.


As the key is missing, the keyboard is simply flipped over and the broken plunger falls out.


We need a spring, so time to rifle through the tub of junque fixings to see what we have that looks promising...

I'm kicking myself slightly here, as I junked a few old PC keyboards a couple of weeks ago that would have provided a perfect spring!

Hmmm ... 1 is too small and too stiff, 2 is too tall, 3 is way too stiff and 4 is suitable for closing a garden gate ...


Spring two is simply cut down to about 12mm long...

Looking good.


The replacement blank key snaps in place, and the tension is about perfect.


While the keyboard is in bits, the contact surfaces on the PCB are cleaned with a cloth and a bit of IPA. If your keyboard is not responding well, and needs a bit of force to work, you can clean the rubber contact surface on the plunger too. Mine works fine, so I'll not do that here.
The PCB can now be reassembled, taking care to ensure the power LED fits back through the hole.


And finally the machine is back together... 
A word on retrobrighting... Apparently these machines don't retrobright well, the legends fade on the keys. Now I've been watching a few YouTube videos on the chemistry and science behind retrobrighting. This one especially interests me https://www.youtube.com/watch?v=YPl356YKcVs&t=1557s 
What is interesting here is he uses a heat pad, rather than UV light, which is better for me, as I'm located in an overcast area of the UK. Sun is in short supply, and I don't fancy going out and getting a UV floodlight. Anyway, I won't be retrobrighting this unit, because of the tendency for the keys to fade.

What I did try was leaving it in the sun for a bit (when we were lucky enough to have some in early September (August was hopeless) .
Other than having to keep popping out, and bringing it in when it looks like rain. I think it's stating to make a difference... Look at the top and bottom section of the case here.. I'll carry on for as longs as the sun lasts! 

Sunday, 19 September 2021

Audio Innovations Series 300 repair

Dave the Quad phoned...

"Got an Audio Innovations here, it's cracking in one channel. Can you take a look?"

Yeah .... why not?


It's a Series 300 amplifier from the late 80's early 90's. Not sure I care for it's styling to be honest ... anyway...

Off with the top, and there's a nicely laid out PCB, featuring solid state rectification, an ECC83 phono pre-amp, ECC83 pre-amps, and four triode-pentode ECL86's (the two triodes in each output pair forming the phase-splitter)

Connecting a set of speakers, and waiting for everything to warm up, soon reveals the fault. 

The third ECL86's tube base is flashing over... This can be indicative of output transformer failure, a failure in the valve itself, or the amplifier having been run with the speakers disconnected. Once a tube base has started to flash over, no amount of cleaning will sort it reliably. We'll change all four to be on the safe side. Let's hope the transformer is OK. Try as I might to get a photo of it... I couldn't.

Disassembly is a bit of a pain ... 

First off, check that reservoir capacitor has discharged to a low voltage. This particular amp rapidly sinks to a safe 14V or so after a few minutes off... but check it anyway!

Remove the knobs. They're secured to the shafts of the controls by a small grub screw with a hex head.


Unsolder the wiring to the gain control. A red, white and black wire. I wonder why this network is suspended like this? Added after to remove a bit of DC from the pot perhaps?

Undo the nuts securing the controls to the front panel, and gently lift clear. 


There are three M3 nuts, and a few plastic stand offs which must be released to allow access to the print side of the PCB. I removed the valves. Keep the ECL86's in the same order that they were removed.

I gave the PCB a blanket re-solder as a good few of the joints looked suspect, and replaced the four output valve holders.

Once everything's reassembled, the amp is tested, and, thankfully, the output transformer is OK. 

A lovely sounding amp, and absolutely silent.. no hum and almost no blow. Superb. 

It's soak tested with Matt Berry - The Blue Elephant.

Another saved from landfill! 

Thursday, 16 September 2021

Martin's other Luxman R-1040

Having completed Martin's first Luxman R-1040 (and his L-80V, both documented on these pages), he wanted his second R-1040 re-capped and set up.

...why not ?

I wasn't going to do a post about this, as the job was going to be identical to the previous, but it turned out differently...

Well, after the arduous task of re-capping was complete, it was time for a test & to set the bias etc ...

This is the part where I wished I'd powered it up before I'd re-capped it ...

The bias is drifting around all over the place on the Right hand channel power amplifier. I set it up, and all appears OK, look at the meters a few minutes later and it's drifted. It's also very slightly crackling.

"That's bound to be the pot"


The bias pot, VR202b, is replaced, to no avail ... meh. VR201a (DC offset) also proves to be innocent. 

Checking the DC conditions around the amplifier, things are moving around a lot around Q204b, a 2SC945. Not having a replacement, I swap out the same transistor from the other amp. No change. 

I'm starting to think I may have swapped a cap out, and may have fitted a brand new, but faulty cap. Prime suspect being C205b and maybe C204b ... they both check out OK. 

I then decide to probe round the stage, under quiescent conditions with the oscilliscope. The voltage on the base of Q204b (and the collector of Q204b) is not steady. I scope the supply back. "Spiky" on both sides of R212b, but steady the other side of R211b ... R211b somehow noisy?? I've seen this happen with old carbon resistors in valve amps before. R211b (3.9K) is duly evicted and replaced. The supply is now steady and the amp quiet...

The bias is now set for 45mA per side, and remains rock sold. DC offset is also set, and doesn't budge.

The workshop MP3 player is hooked up, hoping to enjoy some International Teachers of Pop. No such luck ... well 50% luck. 

There's no audio on the left hand channel. Not from any source.

I put a tone into the left hand channel and trace the signal through the amp. It meanders it's way through the source switching, through the balance and volume control, then disappears across the volume control buffer PCB... 


The signal enters on P301a, via the volume pot VR301a, which, thankfully is innocent, as it's one of those 4 pin affairs (used for balance) and the signal appears at the base of Q301a. The DC conditions are, once again, off here. The -23V is fine at R309, but woefully low after R306a. The voltage on the output capacitor should be -16V, it's -2.3V. Thinking back to the amplifier, R306 is checked, and proves it's innocence. It's not going to be C302a, as that is fed by a 33K resistor, and isn't capable of pulling the rail down that far. Q301a ? Q302a?... I'm betting on Q302a, a 2SC1345 (it was easier to remove!) ... a quick diode test in circuit gives inconclusive results, so it's pulled out of circuit, and put on the Peak tester...

... eh ? Should be NPN...

... don't think so ...


... nah, it's sick as a dog ...

... and has given up having much in the way of gain!


Evil thing... 

Looking the in transistor drawer, I don't have a replacement, so a BC547 is used, making sure the legs are bent to ensure the base and collector go to the right holes!

DC conditions are restored, as is sound!

I think there was originally some foam tape against the chassis to provide some insulation between the volume control PCB and the front of the chassis. This has long since turned to dust and vanished, so a bit of capton tape is used when the PCB is refitted.


https://itop.tmstor.es/product/62301

After the dial illumination is converted to LED, the amp is reassembled and soak tested with the most excellent Pop Gossip by The International Teachers of Pop